


The best way to master a programming language and start our career as a developer is to develop projects to solve real-life problems.
In this article, we are going to solve one such real-life problem, the problem of keeping a list of tasks one might want to do in a day.
Maintaining a To-do list always helps to organize the day and work better and make it the most productive.
Let’s start with the development of python To-do list.
Prerequisites : Introduction to tkinter Python offers multiple options for developing GUI (Graphical User Interface). Out of all the GUI methods, Tkinter is the most commonly used method. In this article, we will learn how to create a ToDo GUI application using Tkinter, with a step-by-step guide.
About
- Python ToDo List is a software that holds information about upcoming tasks or events.
- Users need a handy software that can be used quickly for taking quick notes. And that is where the to-do list is used.
- In this tutorial, we will create a simple to-do list application using Python Tkinter that will help users to organize their short notes, messages, or tasks.
- If we talk about the regular todo list application, then we will notice a text area wherein the user can type message, a button that holds the
Features
- Listbox: We will be using Python Tkinter Listbox to show multiple tasks stacked one after another. And tasks can be selected when clicked on it.
- Scrollbars: Scrollbars will help us to stack plenty of data without worrying about the space on the window. The Tasks can be accessed by scrolling the Listbox.
- Frame: Frame will be used to put widgets like Listbox and Scrollbars inside it. This will give us control to align Listbox to the left & scrollbar to the right so that they both appear parallel & perfect.
- Buttons: We will add two button widgets on the window. One is to add more tasks in Listbox and the other is to delete tasks from Listbox.
- Entry box: Users will type the task in the entry box which further will be displayed in the Listbox.
- Messagebox: The Python Tkinter message box is used to display an error message when the user clicks on the add button with an empty entry box.
Step 1 : Import Modules
import tkinter
from tkinter import *
from tkinter import messagebox
import sqlite3
Step 2 : Create Database connection and Functions
conn = sqlite3.connect('data.db')
conn.execute('''CREATE TABLE IF NOT EXISTS todo(
    id INTEGER PRIMARY KEY,
    task TEXT NOT NULL
);''')

def show():
    query = "SELECT * FROM todo;"
    return conn.execute(query)

def insertdata(task):
    query = "INSERT INTO todo(task) VALUES(?);"
    conn.execute(query, (task,))
    conn.commit()

def deletebytask(taskval):
    query = "DELETE FROM todo WHERE task =?;"
    conn.execute(query, (taskval,))
    conn.commit()
Step 3 : Create Splash Screen
splash_root = Tk()
splash_root.title("ToDo")
splash_root.iconbitmap("logo.ico")
splash_root.geometry("300x200")
splash_root.config(bg='black')

fra =  Label(splash_root, text="ToDO", font=('champion', 40), fg="white", bg="black")
fra.pack()
fra.place(anchor="center", relx=0.5, rely=0.5)
Step 4 : Create Main Screen and Add, Delete & Show Functions
def main_window():
# add and delete function
    def add():
        if(len(addtask.get()) == 0):
            messagebox.showerror(
                "ERROR", "No data Available\nPlease Enter Some Task")
        else:
            insertdata(addtask.get())
            addtask.delete(0, END)
            populate()

    def deletetask(event):
        deletebytask(listbox.get(ANCHOR))
        populate()

# main screen start
    splash_root.destroy()
    main = tkinter.Tk()
    main.title("TODO")
    main.geometry("500x600")
    main.resizable(False, False)
    main.iconbitmap("logo.ico")
    main.configure(
        background="#1d1d1d",
    )

    tkinter.Label(
        main,
        text="TODO APP",
        background="#1d1d1d",
        foreground="#eeeeee",
        font=("champion 25")
    ).pack(pady=10)

    addframe = tkinter.Frame(
        main,
        bg="#1d1d1d",
    )
    addframe.pack()
    addtask = tkinter.Entry(
        addframe,
        font=("Verdana"),
        background="#eeeeee",
    )
    addtask.pack(ipadx=20, ipady=5, side="left")

    addbtn = tkinter.Button(
        addframe,
        text="ADD TASK",
        command=add,
        background="#000000",
        foreground="#eeeeee",
        relief="flat",
        font=("Verdana"),
        highlightcolor="#000000",
        activebackground="#1d1d1d",
        border=0,
        activeforeground="#eeeeee",
    )
    addbtn.pack(padx=20, ipadx=20, ipady=5)

    tkinter.Label(
        main,
        text="Your Tasks",
        background="#1d1d1d",
        foreground="#eeeeee",
        font=("Calibri", 18),
    ).pack(pady=10)

# show function
    def populate():
        listbox.delete(0, END)
        for rows in show():
            listbox.insert(END, rows[1])


    taskframe = tkinter.Frame(
        main,
        bg="#1d1d1d",
    )
    taskframe.pack(fill=BOTH, expand=300)
    scrollbar = Scrollbar(taskframe)
    scrollbar.pack(side=RIGHT, fill=Y)
    listbox = Listbox(
        taskframe,
        font=("System 17 bold"),
        bg="#1d1d1d",
        fg="#eeeeee",
        selectbackground="#eeeeee",
        selectforeground="#1d1d1d",
    )
    listbox.pack(fill=BOTH, expand=300)
    listbox.config(yscrollcommand=scrollbar.set)
    scrollbar.config(command=listbox.yview)

    listbox.bind("<Double-Button-1>", deletetask)
    listbox.bind("<Delete>", deletetask)

    populate()

    tkinter.Label(
        main,
        text="TIP : Double Click On A Task to Delete",
        background="#1d1d1d",
        foreground="#FFEB3B",
        font=("Perpetua", 12),
    ).pack(side=BOTTOM, pady=10)
Step 5 : Add this code in bottom
splash_root.after(1000, main_window)
mainloop()
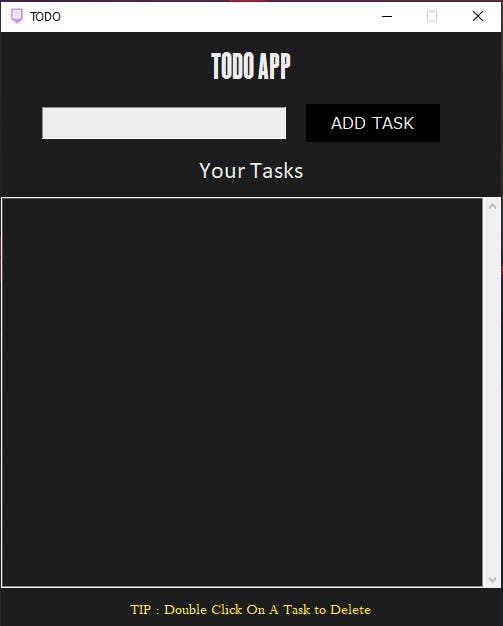
Output:
Here is the output screenshot for the above code.
 Complete Source Code: Download